How to Paint a Bong DIY: 5 Easy Glitter Steps
Learning how to paint a bong DIY is a satisfying weekend project that turns a plain piece into a one-of-a-kind custom piece. In this guide, we walk through the complete process of creating a custom glitter bong DIY project — from taping and spray painting to gluing glitter and sealing with acrylic varnish. No artistic ...
Learning how to paint a bong DIY is a satisfying weekend project that turns a plain piece into a one-of-a-kind custom piece. In this guide, we walk through the complete process of creating a custom glitter bong DIY project — from taping and spray painting to gluing glitter and sealing with acrylic varnish. No artistic experience required. Just patience, the right materials, and a little creativity.
Bong Painting Supplies and Materials
Before you start, gather all your bong painting supplies and materials:
- A plastic or glass bong (homemade or store-bought)
- Painter’s tape
- White spray paint (as base coat)
- Modge Podge, Tacky Glue, or similar craft glue
- Glitter in 2 colors (e.g., gold and multi-color silver)
- Acrylic varnish spray (synthetic works fine)
- Box cutter or X-Acto blade
- Paintbrush (for applying glue)
- White paper or parchment paper (to catch loose glitter)
- Scissors
How to Paint a Bong DIY: 5 Easy Glitter Steps
Step 1: Tape Off Protected Areas
Start by taping off the parts of the bong you do not want to paint. At minimum, tape the downstem opening and the mouthpiece — these are the parts that contact your hands, lips, and smoke path. Painter’s tape works perfectly for clean edges. For the downstem, wrap tape around the top portion of the stem, leaving the bottom open so it can still function. You do not need to tape off the base unless you want a clean, unpainted bottom.
Use a box cutter or X-Acto blade to trim the tape for precise edges. Always cut away from yourself — these blades are extremely sharp and slip easily on curved surfaces.
Step 2: Apply White Spray Paint as Base Coat
Take your bong outside and apply 1 to 2 coats of white spray paint as the base layer. White helps glitter colors pop more vividly — gold glitter on white looks much richer than gold on bare glass or plastic. Spray in even passes, keeping the can 8 to 12 inches away. Let the paint dry completely before moving to the next step (at least a few hours).
Tip: If you plan to use mostly gold glitter, consider using gold spray paint as your base instead of white. This hides any gaps in glitter coverage and reduces imperfections.
Step 3: Create Your Glitter Design Pattern
To create a DIY bong spray paint and varnish glitter design with 2 colors, lay strips of painter’s tape randomly across the bong surface after the base coat dries. The tape-covered areas will be one color of glitter, and the exposed areas will be another color. There is no right or wrong way to lay the tape — organic, random patterns often look the most interesting.
Brush craft glue over the exposed (non-taped) areas of the bong. Work in sections and do not apply too thick a coat — a thin, even layer of glue is more effective than a heavy one. Place white paper underneath to catch falling glitter.
Step 4: Apply Glitter and Seal with Varnish
When you know how to paint a bong with glitter, the key is working in stages. Pour your first glitter color generously over the glued areas. Tap the bong against your paper to dislodge excess glitter and collect it for reuse. Let this sit for a few minutes, then take it outside and apply a coat of acrylic varnish spray to seal this first color.
While the varnish is still slightly tacky (not fully dry), peel back the tape strips to reveal the white base underneath. Removing tape while slightly wet gives cleaner lines than waiting for full dryness. Then apply glue to the newly revealed areas, add your second glitter color, let it sit, and apply another varnish coat. Wait at least 24 hours between varnish coats for best results.
Step 5: Add Paint Details and Final Varnish
Once your glitter layers are sealed, you can add paint details for a custom glitter bong DIY project finish. A squeeze bottle of craft paint works well for drizzling thin lines, zigzags, or tribal patterns over the glitter. Black paint adds bold contrast on multi-color or gold glitter. Do not apply the paint too thick — it will look raised and textured as it dries, which can be intentional and adds grip to the piece.
After adding any paint details, apply 2 final coats of acrylic varnish (waiting 24 hours between each). The varnish locks everything in place permanently. Remove any remaining tape from the mouthpiece and downstem, and your custom painted bong is ready to use.
Tips for a Better DIY Painted Bong
- Use parchment paper when varnishing — if you rest the bong on regular paper while the varnish is wet, it may stick. Parchment paper prevents this.
- Water level is invisible after painting — a fully painted bong hides the water level. Mark the outside with a small piece of tape at the correct water height, or learn to gauge it by feel (no water reaching lips = right level).
- Two colors of glitter look better than one — the contrast between zones gives the bong visual depth and makes the design look intentional rather than uniform.
- Collect and reuse fallen glitter — always work over paper. Glitter is expensive and messy. Anything that falls off can be poured back into the container for future use.
- Varnish multiple times — one coat of varnish is not enough to fully protect glitter. 2 to 3 coats create a durable seal that prevents glitter loss during normal use and cleaning.
Frequently Asked Questions
Is it safe to paint a bong?
What type of paint is best for painting a bong?
How do I keep the glitter from falling off?
Can I paint a glass bong the same way as a plastic one?
References
Where to Buy
- Matte White Spray Paintaffiliate
- Acrylic Spray Varnishaffiliate
- Gold Glitteraffiliate
- Holographic Glitteraffiliate
- Cannabis Apparel Store
Some links above are affiliate links. We may earn a commission at no extra cost to you.
Related Posts

Best Barcelona Glass Blowing Event — 5 Things to Know
This Barcelona glass blowing event vlog takes you inside a Boro Fest experience where world-class glass artists gathered to create incredible pieces live. In part 1 of this 2-part series, I share the story of trying to keep up with a group that clearly had no limits — and barely making it home while everyone ...
Best DynaVap Vong-X Stealth Setup — 3 Piece Combo
This DynaVap Vong-X Stealth setup combines 3 pieces into one of the hardest-hitting portable rigs you can carry. In this breakdown, I show you how the Vong-X Stealth, Cap Armor, and a High Artisan J-Hook come together to produce massive clouds with incredible flavor — plus the story of how a session with this combo ...
How to Vaporize Hash with Vapman Click (Step-by-Step Guide)
The most efficient approach to traditional hashish is to vaporize hash with vapman click technique using the manually torch-heated Vapman Click by Inhale. The device signals vaporization temperature with an audible click, removing guesswork from the heat cycle. Traditional hash behaves differently than dried flower — it stores and releases heat differently, requires rhythmic heating ...
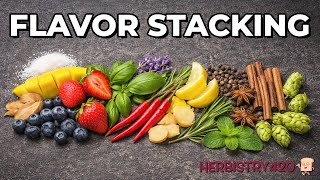
Flavor Stacking: The Taste Trick That Changes Your Cannabis Session
Flavor stacking hits is the practice of intentionally preloading your taste and aroma receptors before a cannabis session to influence how the experience feels. The approach is built around perception, not chemistry. Before a session begins, your senses are already forming expectations. By introducing terpene-rich foods, spices, or aromatic herbs first, you create a sensory ...